TM-11 5895-1412-12&P
Signals
RS-232-C
(CD) DTR
(BA) TxD
(BB) RxD
(CA) RTS
(CB) CTS
(CC) DSR
(AB) GND
(CF) DCD
(NOT USED)
Signals
V.24
108/2
103
104
105
106
107
102
109
9-Pin
25-Pin
(Male)
(Male)
V . 2 4
1
2
3
4
5
6
7
8
9
SHIELD
SHELL
1
DRAIN
6
3
2
8
20
7
4
5
RS-232-C
DSR (CC)
RxD (BB)
TxD (BA)
DCD (CF)
DTR (CD)
GND (AB)
RTS (CA)
CTS (CB)
107
104
103
109
108/2
102
105
106
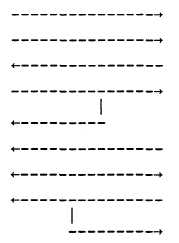
TABLE 2-1 (92221P) BGU to LaserJet pin out
B.
ENTERING SYSTEM CONFIGURATION
From the Personal Applications Manager (PAM) menu shown in Figure 2-1, press
<f6>.
If a disk is-present in the disk-drive, this screen may look different.
Notice the f6 in parenthesis following the figure caption. These hints appear
throughout this document to show the keystroke(s) leading up to the screen
from the PAM menu.
If connecting to the LaserJet through the HP 82164A interface, set the Printer
Interface parameter to HP 82164A instead of Serial.
c.
ENTERING DATACOM CONFIGURATION
Datacom configuration must be set for system components to link-up and
exchange data.
Use the arrow keys to move from line-to-line (see Fiqure 2-31.
Use the serial column when connecting the
the HP 82164A column when using the HP 82
ready to print to the LaserJet.
NOTE:
Refer to Appendix L for Print Menu
LaserJet to the serial port. Use ‘
164A interface.
The computer is now
and Configuration Menu.
2-11