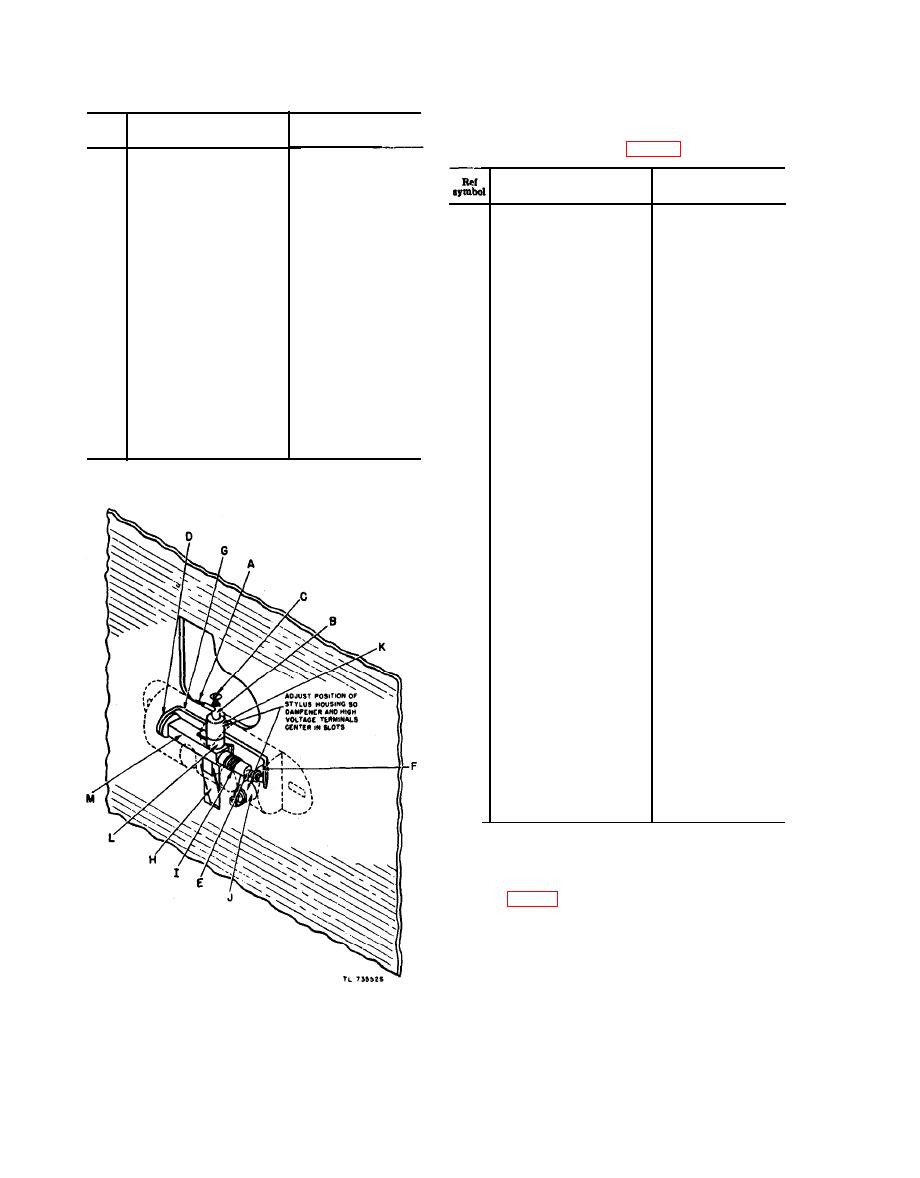
e. Stylus Holder Assembly, Facsimile Transceivers
TT-1D/TXC-1 and TT-1E/TXC-1, and TT-1F/
Ref
Function
Name of part and description
symbol
Rotates stylus shaft
LEVER, stylus shaft -----
H
to remove needle
Name of part and description
from drum.
Rotates stylus shaft
SPRING
---------------
I
Supports stylus nee-
STYLUS ASSEMBLY--
to bring stylus in
dle.
contact with drum;
A
Conducts high volt-
STYLUS
--------------
electrical connec-
age to recording
tion between stylus
paper.
holder and connect-
B
Holder for stylus A.
HOLDER, stylus -------
ing terminal.
C
Left-band pivot for
PIVOT, adjustable -----
Insulates connection
INSULATOR, feed-
J
stylus shaft.
to terminal lug.
through.
D
Supports pivot and
BRACKET ASSEMBLY
Dampens vibration of
D A M P E N E R -----------
K
thrust spring.
needle holder when
E
F o r adjusting end
S P R I N G , thrust-------
riding over paper
play.
clamp of drum.
F
Rotates stylus shaft
LEVER, stylus shaft----
I N S U L A T O R -----------
L
to remove needle
Supports
needle
SHAFT, stylus ----------
M
from drum.
holder.
G
Rotates stylus shaft
SPRING
--------------
to bring stylus in
contact with drum;
electrical
connec-
tion between stylus
holder and connect-
ing terminal.
H
Holds thrust spring
SCREW: No. 2-56-----
on bracket assem-
bly.
I
Supports needle
SHAFT, stylus ---------
holder.
J
Insulates connection
INSULATOR, feed-
to terminal lug.
through.
K
Dampens vibration of
D A M P E N E R ----------
needle holder when
riding over paper
clamp of drum.
L
Holds stylus needle in
SPRING, stylus needle-
needle holder.
M
For mounting bracket
SCREW: No. 2-56-----
assembly to front
panel.
N
Locks pivot in posi-
HEX NUT: No. 6-32--
tion.
TT-1D/TXC-1, TT-1E/TXC-1, and TT-
1F/TXC-1
Follow the procedure outlined below when re-
placing the stylus in Facsimile Transceivers TT-
1D/TXC-1, TT-1E/TXC-1, and TT-1F/TXC-1.
a. Turn the power off.
b. Remove the motor cover.
c. Move the drum to the left as far as it will go.
TT-1/TXC-1, TT-1A/TXC-1, and TT-1B/TXC-1.


